Artgine is an integrated development environment that bundles an Electron-based dev app, a web server, a rendering engine, and a project generator into one. Choose a project path, configure rendering options and included libraries, then press Run(F9) to check the execution flow right away.
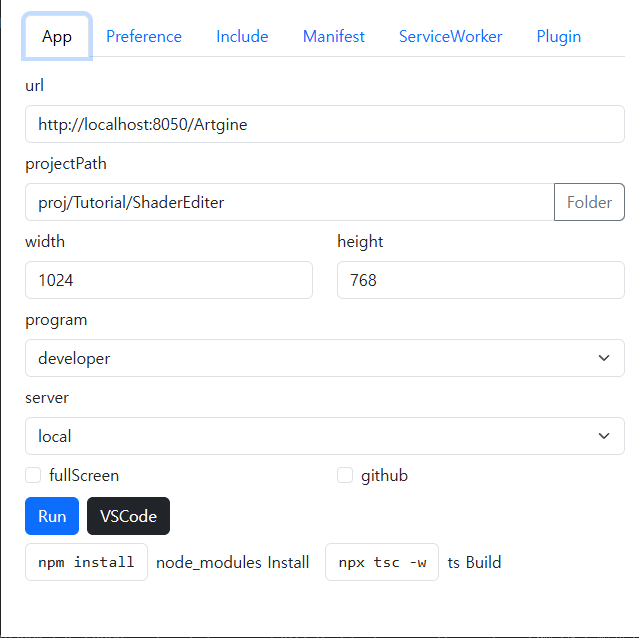
The Artgine app gathers the whole flow — from development to deployment/hosting — into one screen, minimizing setup and repetitive work.
Run one app in three modes, each suited to its purpose.
Configure the run environment with UI checkboxes/inputs instead of code.
A single Run(F9) creates/updates the needed files, cutting repetitive work.
.ts / .html entry files.json project config.webmanifest / ServiceWorker.jsNo need to write boilerplate by hand.
Situations where the Artgine app reduces repetitive work and environment issues in real development/operations.
Keep the project you built in developer mode and just change the App tab's program to server or client to switch it into a deployment/hosting form. No need to build a separate pipeline — the same project, only the run mode changes, all the way to deployment.
Manage engine plugins, external libraries (Include), and PWA (Manifest·ServiceWorker) with UI checks instead of editing each file. Settings are reflected into the auto-generated area of .ts/.html, so adding/removing dependencies takes just a few clicks.
Running with server = local loads straight from the local file path (loadFile), so it is not blocked by web server, port, CORS, or browser security policies. You can work by just opening files without a separate server setup or admin rights.
Server startup, the web rendering environment, and the engine source are bundled with the same configuration inside one app, so different teammates/PCs work in an identical environment. No "works only on my machine" gaps — renderer, server, and engine versions stay unified.
Repositories and tools worth checking out alongside the Artgine engine.
The engine & dev app itself. An integrated dev-environment repo including the renderer, web server, and project generator.
GitHubA collection of sample projects. Reference project structure and engine usage patterns through 2D/3D examples.
SampleA project based on Universal LPC-style character resources. An example of 2D character composition & animation.
ULPCA local web tool that remotely controls your PC screen, files, and AI coding agents from a browser.
GitHubClone the repo and install dependencies. Do this once.
Clone the repo from GitHub, move into the folder, and run npm install to install dependencies. If you already have the source, skip the clone.
git clone https://github.com/06fs4dix/Artgine.git cd Artgine npm install
Using start.bat / start.sh in the Run methods below also auto-installs Node.js/Git if missing and initializes submodules, so you can skip this install step and run directly.
These three are different ways to run, not the same result. Pick one for your purpose.
Executable (double-click). start.bat on Windows, start.sh on Linux.
node desktop/Start.js → Electron GUIWhen you want first-time setup done in one go. Same GUI result as npm start.
Runs node desktop/Start.js directly.
npm install + npx tsc if neededWhen Node/Git already exist and you work in the GUI.
Runs node desktop/WebStart.js.
url in settings.json. Pass an argument (npm run start_web 8080) to use that port, or omit to use the settings.json value.http://localhost:[port] in a browser ([port] is the actual server port)When you only need browser/other-device access. From other devices use the host PC's LAN IP instead of localhost. No GUI, so no Run(F9).
When you launch the GUI via start.bat/npm start (not the web-server-only npm run start_web), you run the project. The method depends on the App tab's program value.
Running with program set to developer in the App tab opens the settings screen (Developer.html) first. There you pick a project and run it with Run(F9).
With the Folder button next to the App tab's projectPath, pick a project folder under proj (e.g. proj/Sample). On selection it reads that project's .json·webmanifest·ServiceWorker settings into the UI. The folder name becomes [Name] (the project name).
Based on the current App / Preference / Include / Manifest / ServiceWorker / Plugin settings, it creates or updates the files needed to run: [Name].ts, [Name].html, [Name].json, [Name].webmanifest, ServiceWorker.js (and chrome_start.bat when the github option is on).
Once files are ready it loads the project. If no server is running it starts one first, then opens [Name].html — via the local file path (loadFile) when server = local, or via url (loadURL) for remote/webServer. If a TS build is needed, it waits for [Name].js (the build output of [Name].ts) before loading.
Pressing F9 again while running returns to the dev screen (Developer.html) and the server is cleaned up.
Running with program set to server in the App tab has no settings screen and no Folder·Run(F9) steps; the moment the app starts, the server launches immediately and the connection-info screen (Server.html) appears.
As soon as Electron opens it auto-starts the web server (CServerMain). The window opens small (480×650), and if server has no web it internally uses webServer+other to run the server. There is no folder picker or Run button.
Once the server is up, Server.html opens and shows URL / Private IP / Public IP / QR. With no settings tabs, it focuses on connection info.
The Browser button opens the current address (public IP first) in the default browser. Other devices like mobile connect by scanning the QR. The Developer button switches to the dev screen.
Server mode is for hosting a project, so there is no file-generation step. The project files must already be built beforehand with Run(F9) in developer mode.
See the Workflow tab for which files are generated/modified and where to edit directly.
Depending on the App tab's program value, the Electron window opens as one of three screens. Each mode has a different UI for its purpose.
settings.json.[Name].json, [Name].webmanifest, ServiceWorker.js. Switching projects carries that project's settings along.settings.json is looked up in the working folder first, then in the desktop folder if not found. (working folder takes priority)The authoring/debugging screen. Developer.html loads, and the top tabs (App / Preference / Include / Manifest / ServiceWorker / Plugin / AI) set the project run and generation options.
Click a tab in the preview above to show that tab's detailed item descriptions below.
The connection-info screen. Server.html opens in a small window (480×650) and, with no settings tabs, shows a centered form focused on URL·IP·QR.
Base URL to reach the project. Copy it with the adjacent Copy button and paste into another browser.
Internal IP used to connect from other devices on the same network (LAN).
Public IP/DNS used to connect from an external network. Used together with port forwarding·DDNS settings.
A QR code you can scan with a mobile camera to connect right away.
Browser opens the current URL in the default browser; Developer returns to the dev settings screen.
When the port is blocked at server start, Artgine asks whether to run through a tunnel. It works, but the tunnel address changes on every server restart, so you must re-authenticate each time. Use it only as a temporary workaround; better to fix the port — allow the port the server actually uses in the firewall inbound rules, and if connecting from outside also set up router port forwarding, then connect via a fixed address.
The end-user run mode. Without going through the developer settings UI (Developer.html) or the server info screen (Server.html), the app loads the project page ([Name].html) into the Electron window as soon as it starts. Use it when you want to show the finished result immediately — deployment, exhibitions, kiosks.
With no settings screen, program = client makes the project appear the moment it runs.
Unlike developer mode, no screen (tool) for adjusting settings is provided. To run in client mode you must open settings.json directly and edit it by hand — set program to client, and adjust projectPath·server·url, etc. (You can also reuse the settings.json you saved with the App tab values in developer mode and just change program to client.)
server value)Where the client opens the project page depends on the server value. Typically these two are used.
When the app starts it auto-starts its own web server (CServerMain) and opens the project via that local URL (loadURL). Use it to run a project needing server API/routing standalone on one PC. (local, which only opens files, loads directly via loadFile.)
The app does not start a server; it connects to an already-running other server's URL to open the project (loadURL). Suited to deploying on a central server with multiple client PCs connecting to the same server.
In developer mode's App tab, change program to client and run — it opens in client mode.
Combined with the App tab's fullScreen option, only the project shows in full screen — suited to exhibition/kiosk runs.
Pressing Run(F9) generates/modifies the files needed based on project settings. The key is distinguishing the auto-generated area from the manually-editable area.
Reads the project settings (App/Preference/Include/Manifest/ServiceWorker/Plugin).
Creates or updates the files needed to run, based on the settings.
Loads the project HTML in the Electron window. If a TS build is needed, it waits for [Name].js (the build output of [Name].ts) before loading.
// At the //Version //Class //Atelier //EntryPoint placeholders in desktop/Template/Basic.ts // the code below is auto-generated during Run(F9)'s file-prep step. import { CPreferences } from "../../../artgine/basic/CPreferences.js"; var gPF = new CPreferences(); gPF.mTargetWidth = 0; gPF.mRenderer = "GL"; gPF.mServer = "local"; import { CAtelier } from "../../../artgine/app/CAtelier.js"; import { CPlugin } from "../../../artgine/util/CPlugin.js"; CPlugin.PushPath("Bloom", "../../../plugin/Bloom/"); var gAtl = new CAtelier(); gAtl.mPF = gPF; await gAtl.Init(["Main.json"], ""); var Main = gAtl.Canvas("Main.json"); //The content above this line is automatically set by the program. Do not modify.🚫💥🔥 //EntryPoint // Editable from here. import { CClass } from "../../../artgine/basic/CClass.js"; import { CObject } from "../../../artgine/basic/CObject.js"; // Write game logic, component registration, and user code below EntryPoint.
<!--Include--> <script type='module' src='../../../artgine/artgine.js'></script> <link rel='manifest' href='./Sample.webmanifest'/> <!--Manifest--> <!--EntryPoint--> <!-- Editable from here. You can place HTML user scripts and UI wiring. --> <script type='module' src='Sample.js'></script>
You can also edit the HTML. But the area above <!--Include--> · <!--Manifest--> · <!--EntryPoint--> is auto-generated; edit below <!--EntryPoint-->.